Helldivers 2 Tier List – The Best Stratagems
Having the best Helldivers 2 stratagems can ensure you clear more difficult content and gain more stars while you’re liberating planets for Super Earth. You only get four stratagems slots so you better make them count!
These rankings take into account all our experiences with all difficulties through level 9 (Helldiver, the hardest difficulty) alongside what we’ve observed top players taking.
As always with our tier lists, we recommend prioritizing your own strengths, weaknesses, and playstyle preferences. As long as you’re clearing the content successfully and having fun, you do you!
Here are our rankings for the best stratagems in Helldivers 2:
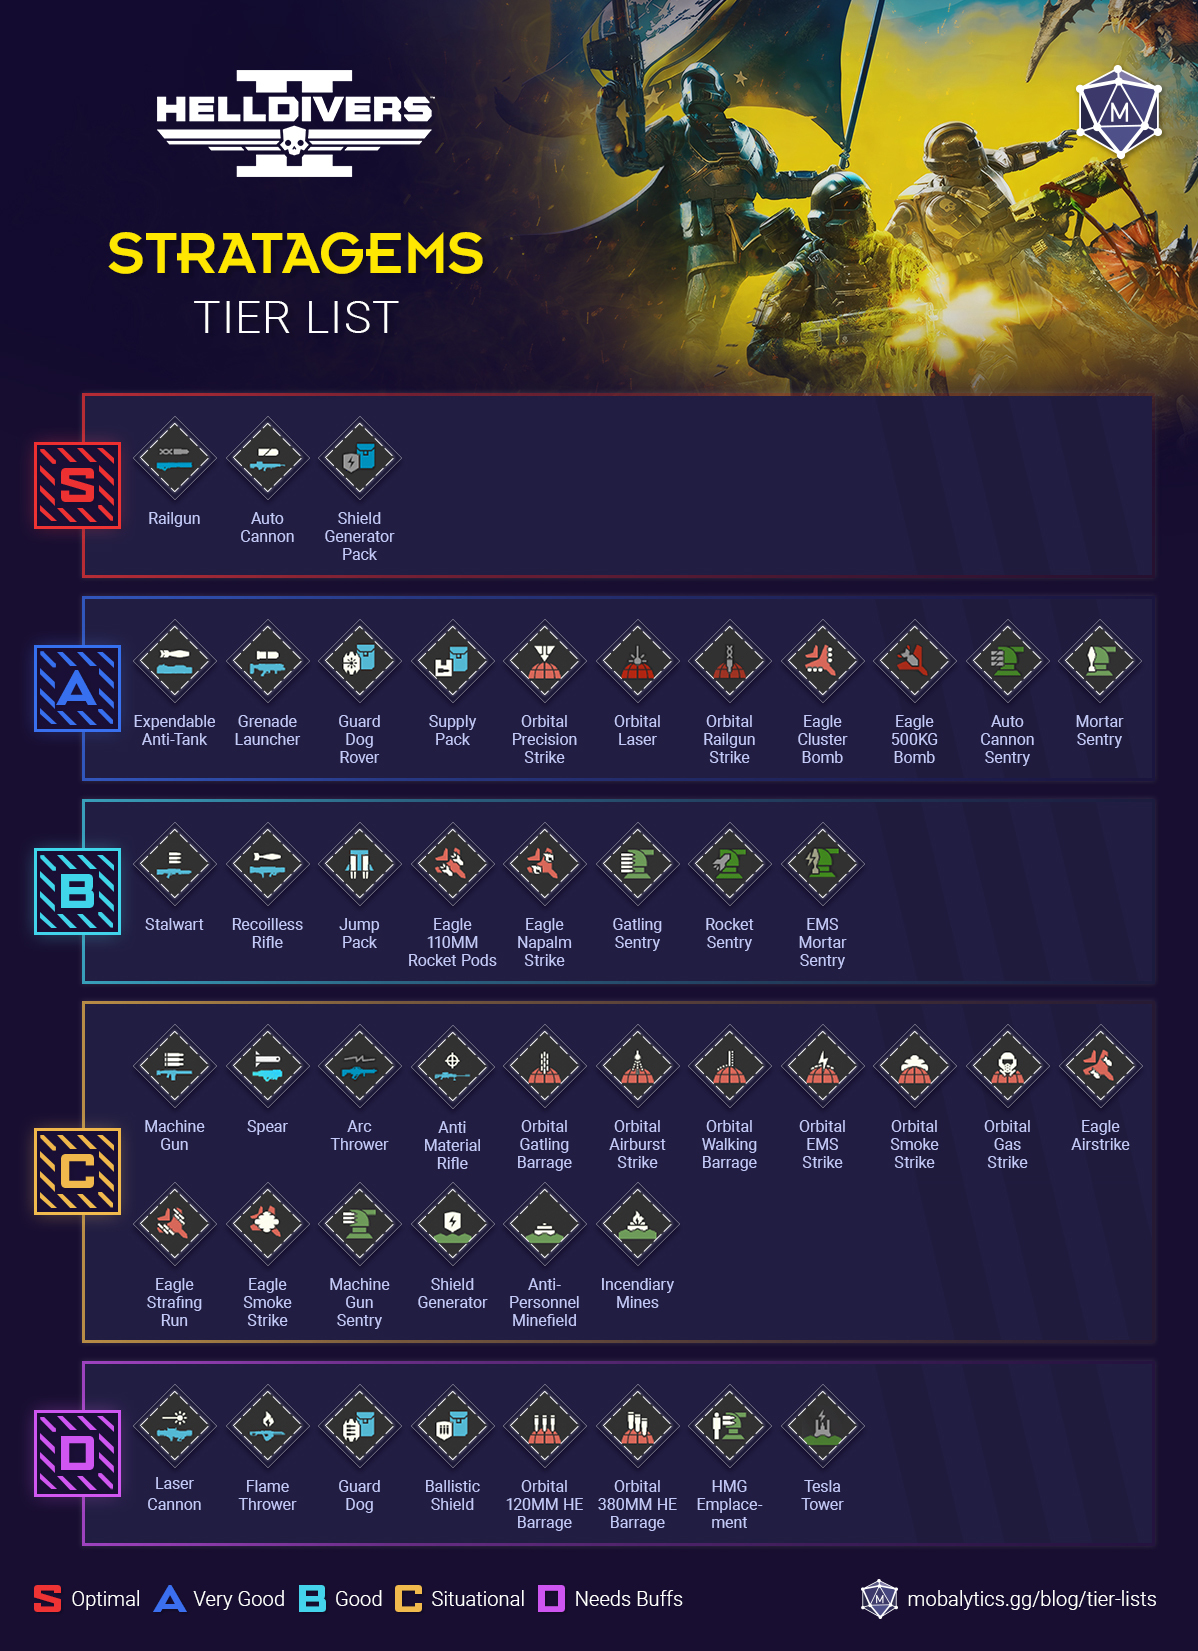
| Tier | Helldivers 2 Stratagems Tier List |
|---|---|
| S | Railgun, Auto Cannon, Shield Generator Pack |
| A | Expendable Anti-Tank, Grenade Launcher, Guard Dog Rover, Supply Pack, Orbital Precision Strike, Orbital Laser, Orbital Railgun Strike, Eagle Cluster Bomb, Eagle 500KG Bomb, Auto Cannon Sentry, Mortar Sentry |
| B | Stalwart, Recoilless Rifle, Jump Pack, Eagle 110MM Rocket Pods, Eagle Napalm, Gatling Sentry, Rocket Sentry, EMS Mortar Sentry |
| C | Machine Gun, Spear, Arc Thrower, Anti Material Rifle, Orbital Gatling Barrage, Orbital Airburst Strike, Orbital EMS Strike, Orbital Smoke Strike, Orbital Gas Strike, Eagle Airstrike, Eagle Strafing Run, Eagle Smoke Strife, Machine Gun Sentry, Anti-Personnel Minefield, Incendiary Mines |
| D | Laser Cannon, Flame Thrower, Guard Dog, Ballistic Shield, Orbital 120MM HE Barrage, Orbital 380MM HE Barrage, HMG Emplacement, Tesla Tower |
Note that the stratagems are NOT ordered within tiers and are instead organized by color categories (weapons, backpacks, strikes, and placements).
For a more visual version of our Helldivers 2 tier list, check out the infographic below (click to expand it):

Stratagem Tier Commentary
S-tier (Optimal)
| Tier | S-tier Stratagems |
|---|---|
| S | Railgun, Auto Cannon, Shield Generator Pack |
The S-tier stratagems are all meta staples and among the most often seen at the highest difficulties against both factions.
The Railgun is the ultimate weapon for taking out armored threats, the Autocannon provides amazing firepower and uptime (especially with allied help), and the Shield Generator Pack is almost necessary to survive the constant onslaught of Helldiver.
Note that since the Autocannon uses up a backpack slot, it is a bit less common than the Railgun which is usually taken with the Shield Gen Pack or other options. However, the Autocannon has the upside of letting you take out a wide range of objectives like nests, factories, and so on from a distance.
The Railgun is more demanding due to its inherent skill demand and mechanics while the Autocannon is much more straightforward and foolproof. You can’t go wrong with either of these choices so it’s up to you!
A-tier (Very Good)
| Tier | A-tier Stratagems |
|---|---|
| A | Expendable Anti-Tank, Grenade Launcher, Guard Dog Rover, Supply Pack, Orbital Precision Strike, Orbital Laser, Orbital Railgun Strike, Eagle Cluster Bomb, Eagle 500KG Bomb, Auto Cannon Sentry, Mortar Sentry |
The A-tier stratagems are all very good in virtually all situations but aren’t seen as “necessary” as their S-tier comparisons.
There are a good amount of stratagems here that are often discussed as S-tier picks in the community such as the 500KG Bomb, Orbital Laser, Eagle Cluster Bomb, and so on but since they depend on your preference and playstyle, we placed them here for now. In many contexts though they are S-tier, just not as many as the top 3.
Other stratagems in A-tier like the E.A.T., Guard Dog Rover, Supply Pack, and Mortar Sentry can all be incredibly impactful but just have S-tier better options to eventually replace them after you level up.
That being said, you can clear the hardest content convincingly with A-tier stratagems, especially with some S-tier choices mixed in. Just make sure to coordinate with the ones that are prone to team killing.
B-tier (Good)
| Tier | B-tier Stratagems |
|---|---|
| B | Stalwart, Recoilless Rifle, Jump Pack, Eagle 110MM Rocket Pods, Eagle Napalm, Gatling Sentry, Rocket Sentry, EMS Mortar Sentry |
Once you get to B-tier stratagems, you’ll find options that are still good in their own right but noticeably less versatile, consistent, or impactful than the S/A-tier options.
If you take them in the wrong context, you can get punished but they definitely have situations where they will shine and look more like A-tier stratagems.
For example, taking the Jump Pack on a flat planet versus one with a lot of vertical mobility will offer a big difference – just be smart about it!
C-tier (Situational)
| Tier | C-tier Stratagems |
|---|---|
| C | Machine Gun, Spear, Arc Thrower, Anti Material Rifle, Orbital Gatling Barrage, Orbital Airburst Strike, Orbital EMS Strike, Orbital Smoke Strike, Orbital Gas Strike, Eagle Airstrike, Eagle Strafing Run, Eagle Smoke Strife, Machine Gun Sentry, Anti-Personnel Minefield, Incendiary Mines |
For the majority of C-tier, we have stratagems that need the right situation to be solid. They may be only good against a particular faction or only effective for a few mission types.
That being said, if you do choose the right situation they can fit right into a high difficulty loadout but may still require more effort than choices ranked above them.
In general, you can likely find better replacements ranked above them outside of a few niche circumstances where the situational choice is exactly what you need.
D-tier (Needs Buffs)
| Tier | D-tier Stratagems |
|---|---|
| D | Laser Cannon, Flame Thrower, Guard Dog, Ballistic Shield, Orbital 120MM HE Barrage, Orbital 380MM HE Barrage, HMG Emplacement, Tesla Tower |
In D-tier are stratagems that are just straight-up bad and need buffs or only work in super niche situations.
The Laser Cannon and Guard Dog are examples of ones that need buffs to be worth taking – we strongly recommend saving your currency for something else.
Choices like the Ballistic Shield and HMG Emplacement are stratagems that do have useful situations but there aren’t enough of them to warrant taking them in most cases.
It is possible to clear the highest difficulties with this tier but will take a lot more effort and/or coordination built around it.
The post Best Helldivers 2 Stratagems Tier List – All Ranked (2024) appeared first on Mobalytics.